 THIS POST MAY CONTAIN AFFILIATE LINKS. YOU CAN READ OUR FULL DISCLOSURE POLICY HERE.
A FEW MORE THINGS BEFORE YOU START BLOGGING
This may be the point where you think “Oh my, what more do I need? Can I just start blogging already?” Well, my friend – you can! You have your hosting and WordPress installed, and your theme uploaded. But I want to help you go even further before you start. There are a few tweaks that you can make to look like a pro blogger right out of the gate.
WHAT’S A BLOGGING ESSENTIAL CHECKLIST?
You are so close to becoming a real life blogger. By making some easy configurations and adding in useful FREE blogging tools, you will have a solid blog to create your content in.
(There is no particular order to the checklist)
1. CHANGE THE BLOG SITE TITLE
If you haven’t changed the blog title yet, you’ll want to do that first. You can do this by hovering over your “Settings” in the left column of your dashboard and click “General”. Change the Site Title to the name of your blog and add a short tagline on what your blog is about. Then scroll to the bottom of the page and hit the “Save Changes” button. The changes will be live immediately.

2. TRASH THE DEFAULT “HELLO WORLD” POST
This is a default post when you install WordPress. You will want to delete this post before hitting the publish button, otherwise the “Hello World” post will appear with it. You don’t want to look like a newbie blogger, do you?
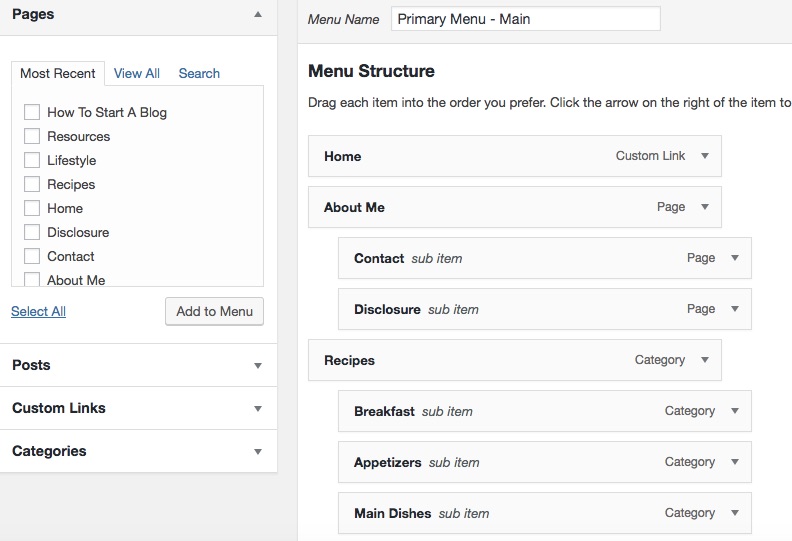
3. CREATE A MENU
It’s important to create a basic navigation menu so readers can easily locate the important pages and your categories. To create a menu, hover over the “Appearance” tab in the dashboard and click on “Menus.” Then click the “Create a new menu” link.
Every website has at least 1 navigation menu. I used to have two menus, but realized only one was necessary. The primary menu is where my posts are linked to one of my categories when I publish a post. You can name menus anything you wish and have as many menus as you need. It’s best to stick to one or two though when you’re just starting out.
When the menu is created, you’ll want to drag and drop the pages and/or categories you want shown. Once you are satisfied with your selections, click “Save Menu.” Here is a partial screenshot of what my menu looks like on the backend.
Now that the menu is done, it’s time to add the menu to your blog. Go to the “Manage Locations” tab. Use the drop down box to select the menu you just created as the primary menu. Then click “Save Changes.” Done!
4. WRITE AN “ABOUT ME” PAGE
An “About Me” page lets your readers know who you are and what your blog is about. After reading Abby Lawson’s Building a Framework and seeing how a strong about me page can keep readers coming back to your blog, I followed her advice and have seen increased views to my page since.
5. CREATE A DISCLOSURE POLICY AND PRIVACY POLICY
If you want to have a profitable blog, you will need a disclosure policy. It is a way to inform your readers that you’re making money from your site, but not in an unethical way. A privacy policy shows how your reader’s information will be used and makes you more trustworthy.
-
- For more information on disclosure policies, check out Simply Stacie’s post
- For more information on privacy policies, check out Shout Me Loud’s post
6. ADD SOCIAL MEDIA BUTTONS
Everytime you publish a new post, you will want to get it in front of as many people as possible. The social media buttons on your page will help you do that. I have social media buttons in 3 places – the side bar under my “about me” box, a floating toolbar on each post and in my footer. It might seem like too many buttons, but as long as they aren’t distracting from the content, anyone who wants to follow me can find the them.
Most paid-for themes come with social media buttons. You just place them where you want on the page and add the web links. The floating left sidebar I use is a plugin called, Social Plug.
7. CHANGE YOUR PERMALINKS
Permalinks are the string of words in the address bar behind your blog address for each post. For example, www.forksnflipflops.com/how-to-start-a-blog is a permalink; everything after the “/”. By default, WordPress configures an ugly mess of characters behind your fixed address. You will want to remember to update it before publishing your first post to something cleaner. I use the title of the post as my string of words, and recommend that option. Deciding to change the permalink structure later on may end up breaking your existing links (I know its confusing, but you will have to trust me).
8. WHERE TO FURTHER CUSTOMIZE YOUR BLOG DESIGN
This step is more of a nice to know. You will no doubt want to customize something on your blog and I want to show you where to go. On the left side of your dashboard, hover over “Appearance” and click, “Customize.”
Here are some of the customizations you can do from this screen:
Site Identity – We already changed the site title and tagline in step 1. You won’t need to do anything further unless you want to change it again.
Colors – You can change the color of your header and/or background color.
Header Image – You can upload a header image you want to use.
Background Image – You can upload a background image for your site.
Navigation -You can choose your primary or secondary (if you created one) navigation menu.
Widgets – Widgets lets you add features to different parts of your blog. It allows you to move, remove and add them from here. I prefer to use the widgets in the “Appearance” section of the dashboard menu.
When you’re done customizing, click the “Save” button.
9. ACTIVATE SSL CERTIFICATE
An SSL certificate is a symbol that let’s your audience know the information they submit via your site is protected. If you will be selling products or services, having an SSL certificate is a must. It provides a high level of encryption and trust to your site. It’s also important to note that on August 2014, Google announced that having an SSL certificate installed on your website will increase the ranking position in search engines.
If you have Bluehost, they provide a FREE SSL certificate. Follow these instructions to activate it from you Bluehost control panel.
10. SET UP GOOGLE ANALYTICS
I could write an entire post about how important Google analytics is for any blog. If you want to be a serious blogger, then you MUST install the Google analytics tool. It tracks your page views, what posts people are reading, how they found you, how long they stuck around and so much more. I don’t know a single blogger that doesn’t have it installed. Along with your WordPress dashboard, the Google analytics dashboard will be your new best friend!
The install can be a little tricky if you’ve never had a blog before, but I’m going to walk you through it. However, if you are a visual learner (like me) – check out this video tutorial from WPBeginner.
Go to https://www.google.com/analytics and create a Google account (if you don’t have one).
When you’ve filled in all the account info, click the “get tracking Id” button, and it will give you the tracking code. This code will need to be pasted into your blog header. If you opted to go with the Genesis Framework (which I did – you can read about in this post), you can download a plugin that makes it easy to paste the code into, called Simple Hooks.
Check out Carrie Dil’s post on the Genesis Simple Hooks Plugin (Number 1 only)
If not using Genesis, here is a post on other plugins you can use
Tip on Plugins – there are thousands of Plugins out there. Plugins are like apps. They give your site more functionality. If you download a plugin and find that you no longer need it, be sure to delete it. It is possible to have too many plugins and this can really slow down your site.
Lesson 5: Installing Plugins
Thanks for the shout out!