 THIS POST MAY CONTAIN AFFILIATE LINKS. YOU CAN READ OUR FULL DISCLOSURE POLICY HERE.
DO YOU WANT TO START A BLOG?
Maybe you have been inspired by other blogs you follow. You want a creative outlet to share your passions with the world. Or maybe you’ve stumbled onto blog income reports and saw that “Yes, you really can make money blogging” and decided it was time to get serious about it.
Let me help guide you on your blogging journey.
After a year and a half of blogging, I’m still blown away by how many people visit my site everyday. Starting this blog and investing in it as it grew, has changed my life! Having that extra income has helped us pay off bills and save up for a downpayment on a house! Think where you could be if you started a blog today!
Start your blog here and then continue with the following steps.
You never know where something of your own creation will take you. Commit to putting in the time and effort. Believe that you can do it.
So throw on your sweatpants, have a seat and follow along with the lessons in this tutorial. I promise it’s worth it!
HOW TO START A BLOG
STEP 1: Selecting a Domain Name
This is the most important, and could even be the hardest step in creating a successful blog. A blog title should be relatable to your content and topics you intend to write about.
You will want your domain name to catch your reader’s attention. Get inspiration from other popular blogs in your niche. Jot down ideas you come across and play around with the words to create a list of possible names.
When you’re choosing a blog name there are a few things to keep in mind.
Make it easy to remember. A name that is clever and flows with the content your’re publishing, will stick with readers and look trustworthy. This is why I recommend having a “.com” domain. Domain extensions with “.net” are not as appealing and come off as scammy. Believe me, people pay attention to that. I even changed my blog name to Forks ’n’ Flip Flops because Forks ‘and’ Flip Flops was already taken and I didn’t want a “.net” extension for the “and” that was available.
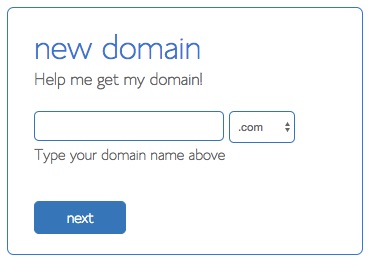
When you have your list of possible domain names, go to Bluehost (they give you a FREE domain) to check if it is available. On the homepage, it is under the Hosting Tab —> Domain.
STEP 2 – Selecting hosting and installing WordPress
Now that you’ve decided on a blog name (that is available), and what you want to write about, it’s time to select a hosting plan.
Remember, if you are going to have a money making blog, you need to OWN your blog. That isn’t free. I explain this in more detail in The Honest Truth About Starting A Profitable Blog.
From the beginning, my blog has been hosted with Bluehost.com and I couldn’t be happier with them.
SHARED HOSTING OR CLOUD HOSTING
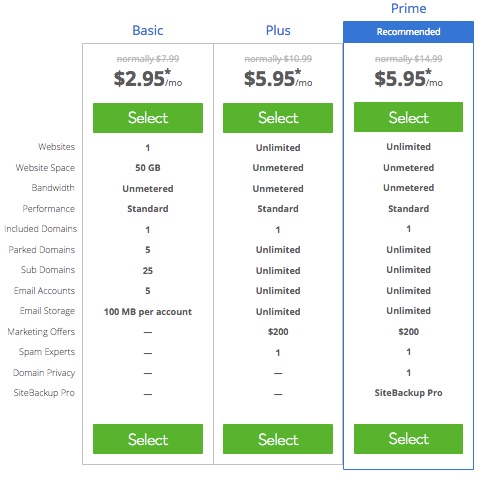
Bluehost has 3 SHARED hosting plans – Basic, Plus and Prime.
My recommendation would be the basic plan for those who are starting a brand new blog. Right now, you can get this for the special price of $2.75/mo (usually $7.99/mo). This low price is offered as an annual fee instead of monthly installments, but this method saves you more money in the end. It comes with a 1-click WordPress install that only takes seconds to complete. Also, if you need any help or have questions – take advantage of there 24-7 tech support.
The Plus and Prime shared hosting plans are the same discounted price, $5.95/month (usually $10.99 and $14.99). These are great if you wanted to start more than 1 website and have unmetered website space. Also, if you have an established blog and are transferring from another shared hosting company to Bluehost and need the unlimited storage.
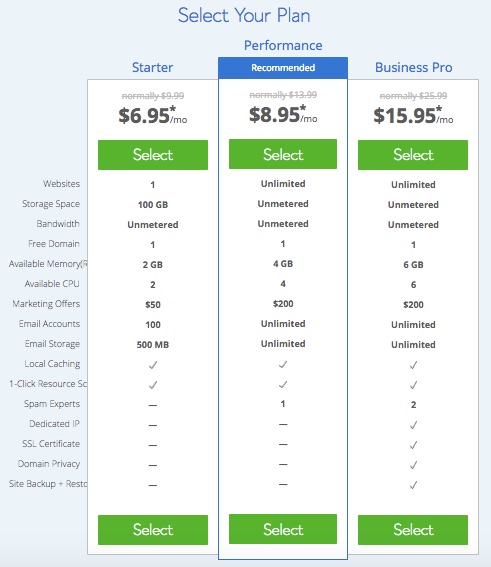
Bluehost also has 3 CLOUD hosting plans – Starter, Performance and Business Pro.
I recommend the Starter plan. That is what I’m using. It is currently at a special discounted price of $6.95/month (regularly $9.99/mo). I started off with the Basic shared hosting plan, but after web traffic started to grow and I was adding more content, my site speed started to slow down. By switching to cloud hosting, my site has been loading pages much faster.
The great news is that you can start with a Basic plan and seamlessly migrate to cloud hosting when you see your page speed slowing down. Bluehost’s 24-7 support took care of everything for me and my site never went down during the migration either!
Bluehost compared to other hosting companies has the best value for the price anywhere!
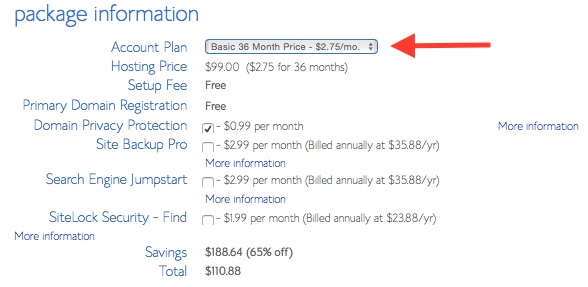
After you’ve chosen your preferred (shared or cloud) plan, Bluehost will take you to the package information where you will be asked about other add-ons. Most of them are not necessary, but you will want to check one in particular. Domain Whois Privacy is the one you’ll want to leave checked ($0.99/month). It hides your personal information, like your address and phone number from being displayed to the public. TRUST ME, you don’t want your personal info out in Blogland!
Here is a screenshot of how the Bluehost Package information portion should look:
STEP 3. REGISTER YOUR DOMAIN
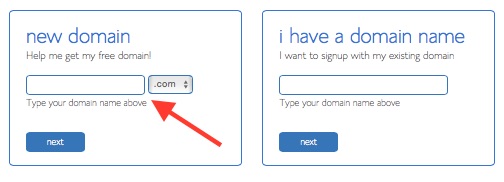
You can buy a new domain here, or sign up with an existing domain if you have already purchased one. (If you are moving an existing website – the transfer is free! )
STEP 4. INSTALL WORDPRESS (IN 1-CLICK)
Once you’ve registered your domain name you will need to install WordPress. Please do not opt for other platforms like Blogger or Tumblr. They have restrictions on the configuration of your blog and are not suitable for use on a professional blog. WordPress.org is the cream of the crop when it comes to blog or business platforms. It is user-friendly and SEO friendly. It has amazing support staff available 24-7, and they support a wide range of customizable themes and plugins. I use WordPress. This site uses WordPress.org (not WordPress.com) and it truly is the best!
The difference between WordPress.com and WordPress.org (best option) is that “.com” is a free blogging platform that has quite a few restrictions and does not allow the source code modifications you would want in a professional blog, particularly with plugin configurations, which helps your blog run more smoothly.
WordPress can easily be installed through Bluehost – which is a one-stop shop for getting your site set up!
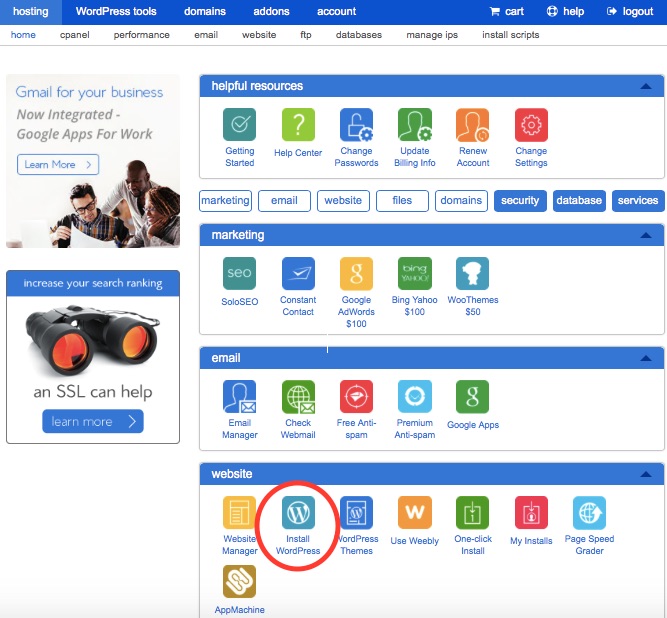
When your logged into Bluehost, go to the “Hosting” tab and click on your “cPanel.”
Once you’ve verified your admin username and email address, click on “Install”:
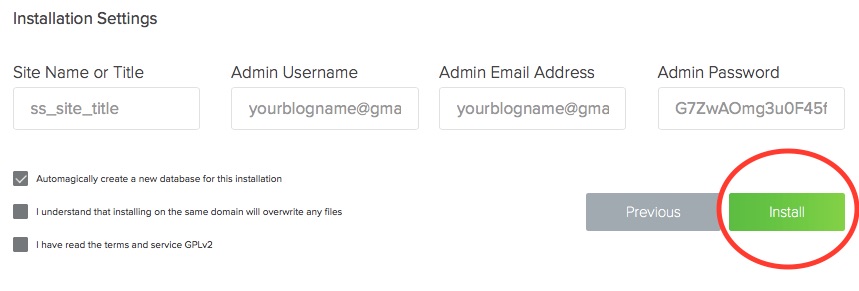
After your install is complete, click on the “View Credentials” button and your login details will appear. Write down your Admin URL, username and password. You can always change your login information later but, you’ll this when you first login to your site.
Your WordPress install is complete!
In the address bar of your browser enter www.yourdomain.com/admin. This will take you to your login page. Go ahead and sign in with the username and password you just created.
You should now see your WordPress dashboard.
You will spend most of your time here!
Even though my recommendation for hosting is Bluehost, there are other popular hosting companies you can check out (I have not tried them personally, but wanted to provide you the information):
Congratulations you now own a website! This is your own space to create amazing content, connect with readers, make money and do virtually anything you want!
Before you start writing, there are a few things you will want to do, like choosing a theme. Your theme is the way your blog looks. There are LOADS of free and premium themes to choose from!
Let’s get started!
Lesson 2: Choosing a Theme
