 THIS POST MAY CONTAIN AFFILIATE LINKS. YOU CAN READ OUR FULL DISCLOSURE POLICY HERE.
YOU NOW OFFICIALLY HAVE A BLOG! CONGRATULATIONS!
Now lets make it pretty!
So you’ve installed WordPress and your hosting is purchased. You are about to embark on an exciting journey. This is where your blog comes to life with the layout, colors and fonts.
If you haven’t purchased hosting yet, you can get a special discount on hosting with Bluehost here.
WHAT NOW?
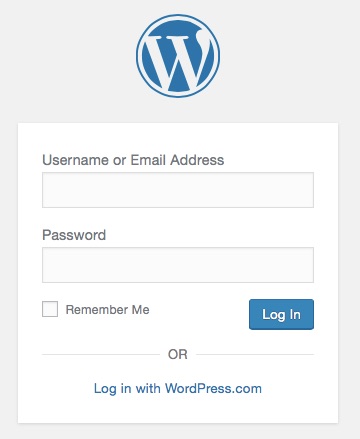
Go ahead and type your admin URL (www.yourblogname.com/wp-admin/) into your web browser. You should see something like this (see screenshot below). Remember that username and password you jotted down? Type that information into the boxes. Do not login with WordPress.com (that is the free WordPress platform, you want WordPress.org).

You are now viewing your new “dashboard”. You will spend A LOT of time here.
Now, it’s time to choose a theme. But how?
When your’re in theWordPress dashboard, you’ll realize that WordPress offers a ton of free themes to choose from. However, these are basic or appear very generic. This is why I highly recommend a premium WordPress theme. Some people choose to hire a designer to create a customizable theme for their site, but you can find a gorgeous theme on the web and customize it yourself to save money. I opted for the latter and have made my budget-friendly recommendations below:
Restored 316 Designs – I currently use the Tasteful child theme for my blog. An amazing theme resource and one I highly recommend. They have easy to follow instructions and lightning fast support if you need it.
The Genesis Framework – This is the current parent framework my blog is using now. Genesis also has an incredible array of minimalist themes by Studiopress, like this Divine theme.
Your probably wondering what parent and child means in a theme. Read this article to understand the what, why and how Genesis Framework is used.
Other top WordPress theme options:
It may feel overwhelming with all of the WordPress theme choices available. You can choose to start with a free theme. Once you get a solid idea on what you want your blog to look like, choose a paid-for theme.
The most important tip I want to give you when picking a theme – make sure it is RESPONSIVE! What this means is that your blog will automatically adjust to fit on the screen of a mobile device. More than 75% of blog reading is done on a mobile phone or tablet, and if your blog doesn’t fit on the screen then you will lose readers.
A LITTLE MORE ON FREE THEMES
There are an endless amount of free themes floating in Blog Land. Free themes are perfectly fine if you just want to keep a personal journal, share stories or photos with family, or even just a fun personal blog. Many of those free themes are available from your WordPress dashboard.
The downside to using free themes is the lack of customization (if any) and tech support from the developer. That’s just the way it is. So if you get stuck trying to make the layout look a certain way, you will be out of luck. I wouldn’t go trying to edit the code of the theme. That’s a sure fire way to mess up your entire blog.
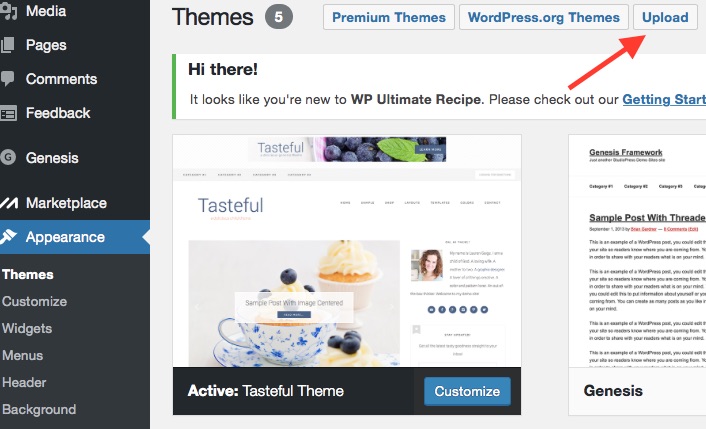
Step 1: To install a FREE theme, go to “Appearance” about half way down the left hand side of your dash board, and click “themes”.

Step 2: This is my themes area, you won’t see Tasteful themes in your dashboard. You can access the free themes by clicking the WordPress.org Themes button.
Step 3: These are the free themes available for you to use! If you hover over one with your mouse, you will see options to read the details and preview it, or install it. If you know you wanna go with a free theme, click the install button on the theme you have selected to get started.
Step 4: After your new theme is uploaded, click Activate. Once it says the activation was successful, click on your blog name in the very top left corner (in the dashboard header) and a drop down will appear that says “Visit Site”. You will see your new theme!
A LITTLE MORE ON PREMIUM THEMES
After trying a couple free themes, I was really unhappy with not being able to customize my site. The customer tech support could have really come in handy. I started browsing around for a new theme and came across Restored 316 and fell in love with their elegant, organized premium themes.
The benefits of Restored 316 was the step-by-step installation guide and FAQ page. It described all the layout options and how to customize them. There are even a few YouTube videos to walk you through additional customizations. When I came across an issue I was having with the header size, I emailed the designer and she responded that day! The unlimited customer support is included in the theme price, which is extremely helpful!
Like I mentioned before, I’m using the Tasteful Theme. It is a child theme to the Genesis Framework. The ability to customize how I wanted my blog to look has been a lifesaver. The theme crossed my path after finding a few other food blogs that were using it. I’ve been so happy with it ever since.
YOU’VE UPLOADED YOUR CHOSEN THEME INTO THE DASHBOARD. NOW WHAT?
This is the point where things get interesting. You have all the fundamentals and functionality to start writing your first post. But first, you need to go a step further. Other how-to-blog tutorials usually stop at this point and say “Good Luck…Start Blogging”, but not this one!
You still have a few more things you will want to do before launching your blog. If you want readers to come to your blog and read about all the exciting things your sharing, its very important to follow the next steps.
Lesson 3: Before Writing Your First Post